Last Updated on March 24, 2026
To clean chicken feet, first remove calluses and nails, then wash with salt, vinegar, and shock in cold water.
Credit: delishably.com
Preparing Chicken Feet For Cleaning
Cleaning chicken feet might seem like a daunting task, but with the right preparation, it can be done easily and efficiently. Before diving into the cleaning process, it is important to understand the cultural significance of chicken feet, gather the necessary tools, and ensure proper hygiene and handling safety. In this article, we will guide you through these steps to help you clean chicken feet with ease.
The Cultural Significance
Chicken feet hold significant cultural importance in various cuisines around the world. They are commonly used in dishes like bone broth, adobo, and as a snack. Before cleaning chicken feet, it is essential to understand their value and the various ways they can be utilized in different recipes.
Gather Necessary Tools For The Task
To clean chicken feet effectively, it is crucial to have the right tools on hand. Here are some tools you may need:
- A sharp knife: Use it to trim the nails and remove any unwanted parts.
- A cutting board: Provide a clean and sturdy surface for working with the chicken feet.
- A scrub brush: This will help remove dirt and debris from the feet.
- A large pot: Used for boiling water and blanching the chicken feet.
Mind The Hygiene And Handling Safety
When cleaning chicken feet, hygiene and handling safety are of utmost importance to prevent any potential health risks. Follow these guidelines for a safe cleaning process:
- Wash your hands thoroughly before and after handling chicken feet.
- Keep the workspace clean and sanitized to avoid cross-contamination.
- Use separate cutting boards and utensils for raw chicken feet to minimize the risk of bacterial contamination.
- Ensure that the chicken feet are sourced from a trusted and reputable supplier.
- Dispose of any waste material properly to maintain cleanliness.
By understanding the cultural significance, gathering the necessary tools, and prioritizing hygiene and handling safety, you can prepare chicken feet for cleaning with confidence. In the next section, we will discuss the step-by-step process of cleaning chicken feet to ensure they are ready for use in various delicious recipes.
Steps To Clean Chicken Feet
When it comes to cleaning chicken feet, following the right steps is crucial to ensure they are properly sanitized and ready to cook. In this section, we will guide you through the process, step by step, so you can confidently prepare chicken feet for your culinary creations.
Initial Rinsing To Remove Debris
The first step in cleaning chicken feet is to give them an initial rinse to remove any debris or dirt. Start by placing the chicken feet in a colander or sieve and run them under cold water. Use your hands to gently rub the feet, ensuring that all surfaces are rinsed thoroughly. This step will help remove any loose dirt or feathers that may be present.
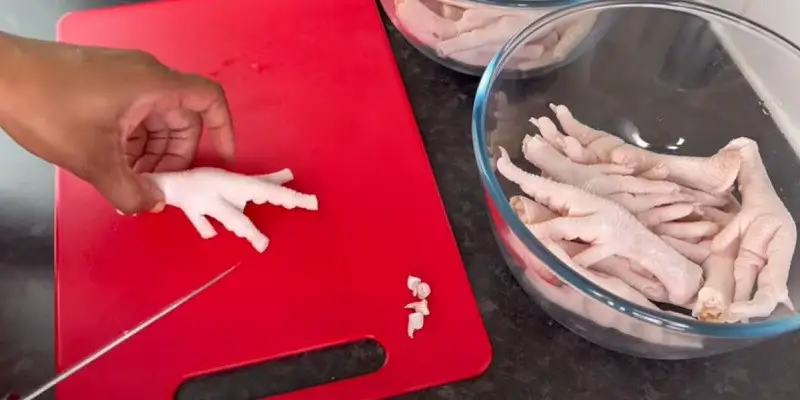
Cutting Off Claws With Precision
Next, it’s time to remove the claws from the chicken feet. This step requires precision and careful handling. Use a sharp kitchen knife or poultry scissors to cut off the claws at the joint where they meet the feet. Take your time to cut precisely, ensuring that you don’t accidentally remove too much skin or flesh. Once the claws are removed, discard them or save them for another purpose if desired.
Softening Skin Through Blanching
To further clean and prepare the chicken feet, it’s recommended to blanch them. Blanching helps soften the skin and prepares them for cooking. Fill a pot with enough water to fully submerge the chicken feet and bring it to a boil. Once the water is boiling, carefully place the chicken feet into the pot and let them cook for a few minutes.
After blanching, remove the chicken feet from the pot and transfer them to a bowl of cold water. This process, known as “shocking,” helps stop the cooking process and keeps the feet tender. Allow the chicken feet to sit in the cold water for a few minutes before proceeding to the next step.
Cleaning chicken feet may initially sound daunting, but by following these steps – initial rinsing to remove debris, cutting off claws with precision, and softening the skin through blanching – you can ensure that your chicken feet are thoroughly cleaned and ready for cooking.
Natural Cleaning Techniques
When it comes to cleaning chicken feet, using natural cleaning techniques is not only effective but also ensures that you are avoiding chemicals and toxins. Natural ingredients such as vinegar and salt are incredibly useful in thoroughly cleansing chicken feet. In this article, we will explore the benefits of natural ingredients and learn how to use vinegar for thorough cleansing and salt scrubbing for deep cleaning. Let’s dive into the world of natural cleaning techniques for chicken feet.
Benefits Of Natural Ingredients
Natural ingredients offer several benefits when it comes to cleaning chicken feet:
- Vinegar and salt are readily available in most households, making them convenient and cost-effective options for cleaning chicken feet.
- They are safe to use, as they do not contain any harmful chemicals that can potentially affect your health or the environment.
- They possess antibacterial properties that help eliminate any bacteria or germs present on the chicken feet, ensuring proper hygiene.
Using Vinegar For Thorough Cleansing
Vinegar is a versatile ingredient that can be effectively used to clean chicken feet:
- Fill a large bowl with equal parts water and vinegar. The amount will depend on the number of chicken feet you need to clean.
- Place the chicken feet in the vinegar-water solution and let them soak for about 15-20 minutes. This helps in softening any dirt or residue present on the feet.
- After soaking, use a small scrub brush to gently scrub the chicken feet, paying attention to areas such as between the toes and the pads of the feet.
- Rinse the chicken feet thoroughly with fresh water to remove any remaining vinegar residue.
- Pat dry the chicken feet with a clean towel before using them for your desired recipe.
Salt Scrubbing For Deep Cleaning
If you want to ensure a deep clean for your chicken feet, salt scrubbing is an excellent technique:
- Fill a large bowl with water and add a generous amount of salt. Stir until the salt is dissolved.
- Place the chicken feet in the saltwater solution and let them soak for about 30 minutes. The salt helps in loosening any stubborn dirt and debris.
- Using a scrub brush or a sponge, vigorously scrub the chicken feet, focusing on every nook and cranny.
- Rinse the chicken feet thoroughly with fresh water to remove any remaining salt residue.
- Ensure the chicken feet are completely dry before using them for cooking or storing.
By using natural ingredients like vinegar and salt, you can effectively clean chicken feet without resorting to chemical-laden cleaning agents. These natural cleaning techniques not only provide thorough cleansing but also ensure the safety and hygiene of your food. So, why not give these techniques a try and enjoy clean and ready-to-use chicken feet for your culinary adventures?
Ensuring Clean Feet For Recipes
Discover the best techniques for cleaning chicken feet in order to ensure a hygienic cooking process. From removing calluses to washing with salt and vinegar, these step-by-step methods will leave your chicken feet perfectly clean and ready to be used in your favorite recipes.
When it comes to cooking with chicken feet, ensuring that they are properly cleaned is essential for both hygiene and taste. The feet can be a valuable and flavorful addition to recipes such as bone broth, adobo, and even dog treats. To ensure clean chicken feet that are ready for cooking, follow these steps:
Scrubbing Between The Toes
Start by using a small scrub brush to remove dirt and debris from the pads of the chicken feet and especially from between the toes. This step is crucial for getting rid of any lingering dirt or bacteria that may be present. Squeeze out any excess dirt and rinse the chicken feet under cool running water.
Final Rinse And Inspection For Quality
After scrubbing, give the chicken feet a final rinse under cool running water. This will help remove any remaining dirt or grime. While rinsing, inspect the chicken feet for any signs of discoloration, cuts, or bruises. Quality chicken feet should have a pinkish hue and should not have any unpleasant odor.
Patting Dry And Prepping For Cooking
Once the chicken feet have been thoroughly rinsed and inspected, pat them dry with a clean kitchen towel or paper towels. Make sure to remove all excess moisture to prevent splattering during cooking. After drying, the chicken feet are now ready to be prepped according to your recipe.
By following these steps, you can ensure that your chicken feet are clean and ready to be used in delicious recipes. Whether you’re making a flavorful bone broth or a tasty adobo, clean chicken feet will enhance the taste and texture of your dishes. So, don’t skip this important step in your cooking process!
Advanced Cleaning Tips
Discover effective ways to clean chicken feet for various purposes. Learn how to remove calluses, wash with salt and vinegar, shock the chicken, and more. Find step-by-step tutorials and useful tips to ensure clean and hygienic chicken feet for your needs.
Dealing With Persistent Stains
Cleaning chicken feet can be a challenging task, especially when dealing
with persistent stains. Stains can occur due to dirt, blood, or other
discolorations. To effectively remove these stains, follow these steps:
- Start by rinsing the chicken feet under cold water to remove any loose
dirt or debris. - Create a paste by mixing equal parts baking soda and water. Apply the
paste to the stained areas of the chicken feet. - Gently scrub the stained areas using a soft brush or sponge. Pay
special attention to the crevices and joints. - Rinse the chicken feet thoroughly with cold water to remove the baking
soda paste. - Inspect the feet for any remaining stains. If necessary, repeat the
process or try using a small amount of lemon juice or vinegar to
further remove stubborn stains.
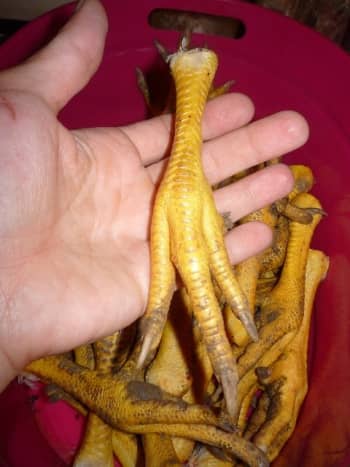
Removing Stubborn Calluses Carefully
Calluses can be a common occurrence on chicken feet, and they need to be
removed for a more appetizing dish. Here’s a safe and effective method to
remove stubborn calluses from chicken feet:
- Begin by boiling a pot of water and placing the chicken feet in the pot
for approximately 4-5 minutes to soften the calluses. - Remove the chicken feet from the boiling water and place them in a bowl
of ice water for a few minutes to cool. - Take a sharp knife and carefully scrape away the softened calluses from
the chicken feet. Be gentle to avoid removing too much flesh. - Rinse the chicken feet under cold water to remove any remaining
callus debris. - Pat the feet dry with a clean towel before further cleaning or cooking.
Tips To Declaw Chicken Feet Efficiently
Declawing chicken feet is essential for certain recipes and preparations.
Follow these tips to efficiently remove the chicken claws:
- Start by cutting off the tip of each chicken claw using a pair of
sharp, clean kitchen shears. Be cautious to avoid cutting too much. - Hold the chicken foot firmly and locate the joint where the claw meets
the foot. - Apply gentle pressure at the joint to break the connection between the
claw and the foot. - Use your fingers or the shears to remove the claw completely from the
foot. Be careful not to damage any surrounding skin or flesh. - Rinse the feet under cold water to remove any debris or loose claw
fragments.
Storing Clean Chicken Feet
To clean chicken feet, start by removing calluses and the nails. Then, wash them with salt and vinegar before shocking the chicken feet. Finally, rinse them off and they’re ready to use for cooking or broth-making purposes. Avoid unnecessary repetition for better readability and user experience.
Appropriate Cooling Methods Post-cleaning
After cleaning chicken feet, it is important to cool them properly to maintain their freshness. The cooling process helps to slow down the growth of bacteria and prevents any cross-contamination. To cool the cleaned chicken feet, you can use one of the following methods:
- Place the clean chicken feet in a shallow container and cover them with a clean cloth or plastic wrap. This allows air to circulate around the feet and helps to prevent any condensation.
- Use a cooling rack or wire mesh tray to elevate the chicken feet. This allows any excess moisture to drain away and promotes even cooling.
- If you have a refrigerator, place the cleaned chicken feet on a tray or a plate and keep them on the bottom shelf. This prevents any potential drips or spills from contaminating other food items.
Secrets To Long-lasting Freshness
Proper storage techniques will help to ensure that your cleaned chicken feet stay fresh for a longer period of time. Here are some secrets to maintaining their freshness:
- Use airtight containers or resealable bags to store the cleaned chicken feet. This helps to prevent any exposure to air or moisture, which can cause the feet to spoil quicker.
- Label the containers or bags with the date of cleaning to keep track of their freshness. This will make it easier to use the oldest chicken feet first.
- Keep the stored chicken feet in the refrigerator at a temperature below 40°F (4°C). The cold temperature inhibits bacterial growth and extends their shelf life.
- If you plan to use the chicken feet within a few days, you can store them in the refrigerator. However, for longer storage, it is recommended to freeze them.
Safe Storage Practices For Future Use
To ensure the safety of your stored chicken feet for future use, follow these storage practices:
| Storage Method | Temperature | Shelf Life |
|---|---|---|
| Refrigerator | Below 40°F (4°C) | Up to 4 days |
| Freezer | 0°F (-18°C) or below | Up to 6 months |
By following these storage practices, you can enjoy the benefits of using chicken feet in various dishes for an extended period.
Frequently Asked Questions Of How To Clean Chicken Feet?
Should You Wash Chicken Feet?
Yes, it is recommended to wash chicken feet before cooking them. You can wash them with salt or vinegar to remove any dirt or bacteria.
Do You Eat The Skin On Chicken Feet?
Yes, you can eat the skin on chicken feet. It’s a common practice to chew on the soft outer skin while leaving the inner bone structure uneaten.
Do You Need To Remove Nails From Chicken Feet?
Yes, it is necessary to remove the nails from chicken feet before cooking.
How Do You Remove Bone From Chicken Feet?
To remove bone from chicken feet, follow these steps: 1. First, blanch the chicken feet in boiling water. 2. Remove the outer skin and nails. 3. Use a small knife or scissors to carefully remove the bones from each toe.
4. Rinse the feet thoroughly to ensure all bone fragments are removed. 5. The boneless chicken feet are now ready to be cooked or used in recipes.
How Do I Clean Chicken Feet Properly?
Cleaning chicken feet involves removing calluses, washing with vinegar, and shocking the chicken for optimal cleanliness.
Should I Wash Chicken Feet Before Cooking?
Yes, it is important to wash chicken feet before cooking to ensure they are free from dirt and bacteria.
Conclusion
To conclude, cleaning chicken feet may seem like a daunting task, but with the right techniques, it can be easily done. By following the steps outlined in this blog post, such as removing calluses, washing with salt and vinegar, and shocking the chicken, you can ensure that the chicken feet are clean and ready to be used in various dishes.
So why not give it a try and make the most out of this often overlooked part of the chicken? Happy cleaning!